The Millennium Falcon Cake

OK, so let’s start with – if you haven’t seen Star Wars, then you may not truly understand this cake. If you’re a fan of Star Wars (like me) – then I know you’ll appreciate the details that have gone into the overall design and construction of this one. It is the Millennium Falcon flying over Tatooine – the desert planet where the Star Wars movies first began. I felt like this cake deserved a post of its own – so you can see the amount of work and effort that went into it. A cake sometimes goes beyond just a cake. This is one such creation.

Anti-gravity Millennium Falcon Cake

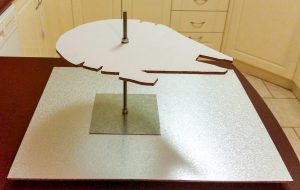
This isn’t a step-by-step tutorial on how to make one of these.  It is just an overview of some of the tools/hardware that went into it. I had to put on my tradie hat for this one and design the structure myself. I started by first getting the blueprints for the MF. This helped me figure out the size of the cakeboard that I would need and I went from there in tracing the shape and cutting out the cakeboard. In my case, the cake was a 10″ round for the main part of the body. Other components were built up using Rice Krispie Treats and cake offcuts mixed with buttercream.

Millennium Falcon Cake - top view

The tools I used to complete the project:

  • Jigsaw – with blades suitable for wood and metal
  • Electric drill – with drill bits suitable for wood and metal (2mm & 8mm bit sizes)
  • Spanner set
  • Hot glue gun
  • Hacksaw – with blade suitable for metal
  • Airbrush
  • General cake modeling tools

Anti-gravity Millennium Falcon Cake structure

The hardware/packaging that went into it:

  • 16″ x 12″ masonite cake board
  • 20″ x 16″ masonite cake board
  • 2x 10″ cake cardboard rounds
  • 20″ x 16″ cake box
  • 3x 6″ x 6″ squares of 1.55mm galvanised steel sheet
  • 8mm stainless steel threaded rod (length is determined by how high you want the MF to fly off the ground – I went with about 40cm)
  • 4x 8mm stainless steel lock nuts
  • 1x 8mm stainless steel flat washer
  • 12x 25mm round self-adhesive felt floor pads – stacked in 3s and hot glued to the underside of the cakeboard to raise it high enough so the threaded rod doesn’t touch the table.
  • String of Blue LED fairy lights, button battery powered (I went with 40 lights/4m) – I adhered them onto a cut strip of cakebox cardboard using sticky tape.

Anti-gravity Millennium Falcon Cake with lights

The cake itself was a 10″ round red velvet, filled with vanilla bean cheesecake flavoured buttercream. Covered with white chocolate ganache and fondant.  I used a mix of crushed Scotch Finger and Gingernut biscuits to create the dessert sand (that wasn’t a typo, I mean to type dessert 😉 ).

Macaron Mania

Macarons. You either love making them, hate making them – or you pull your hair out over and over again while trying to find the perfect recipe. Sad news – there is no perfect recipe. You just need to keep trying until you find the one that works best for you and your equipment.

You may recall my previous mac-post boasting about adapting to the Swiss method – as I had never been able to achieve full macarons  with French or Italian recipes. The only issue I had with the recipe I was using: I could only successfully cook about 10 shells onto a tray lol The outer ring of macs would crack if I  filled the whole tray.

That’s OK if you’re only needing a few – but for bigger lots, it’s just impractical and takes too long… So I banked up egg whites in the freezer over a couple months, and when I had a order-free weeks I went back to looking for another suitable Swiss-method mac recipe.

I’d tried a few recipes recommended on the All Things Macarons group on Facebook – but none were working no matter the tweaks I made. So I was running low on egg whites and time; I turned to YouTube. I managed to find a recipe that worked for me and I breathed a HUGE sigh of relief as I needed them for an order a week away.

Macarons

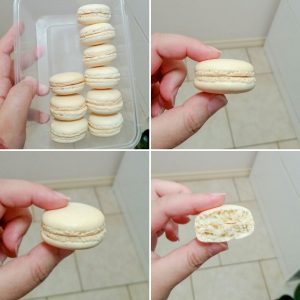
Macarons success!

I did take notes on slight adjustments/techniques that I used to get absolute success with these cookies:

  • I didn’t monitor the sugar/egg temperature while on double boiler (#lazycook). I only periodically checked to see if the sugar had dissolved – once it had, it came straight off the heat and I started whipping with my el-cheapo 5-speed hand mixer
  • I did: 2 minutes @ speed 1, 2 minutes @ speed 2, 2 minutes @ speed 3, scrape down sides (can add gel colouring at this stage), then 1 minute @ speed 2
  • Macaronaged as per YouTube video; takes me 3 scrape rotations to get the right consistency
  • Used Loyal plastic tube size 9 (9mm round tip) in 12″ bag (the recipe yields a small batch of approx 12-14 cookies, you don’t need a bigger bag)
  • Piped perpendicular onto Glad baking paper with printed mac template underneath (5cm diameter). Firmly rapped tray onto bench 4x, then used a toothpick to smooth out tops.
  • I set my oven to Fan Bake mode (it is an electric oven – top and bottom elements are on plus rear fan to circulate air around) – looking to get a 175°C reading on my oven thermometer that I have sitting on the middle rack
  • Let rest until matte finish and dry to touch. (In my area it is about 20-30 minutes)
  • Double trayed and put into oven, immediately reduce temp to 140°C setting (I find that my  oven doesn’t start heating again during the 14-minute total cooktime). I place a sheet of baking paper on top of the macarons at the 8-minute mark to help prevent any browning (while the oven elements don’t turn back on, the fan is still going around)
  • After the 14 minutes cooktime, I check that I can remove one cookie without any sticking issues – if so, I pull the tray out. If not, I leave for an extra minute and recheck
  • Once they’re out, I increase the oven temp again to 175°C to ready for the next batch to go in
  • Straight from the oven I tend to crack open a cookie to check that it’s full (om noms). Once they’re cool enough to touch, I match up pairs and place into an air-tight container.

Now here is the funny thing about doing the cookies this way – they look like a macaron (smooth tops and ruffled feet); they taste like a macaron (yummm), and they’re full (#winning). But (there’s always a but isn’t there..) – I find that they are a little on the crunchy side. So I turned to Dr Google lol And here is what I found – this is actually a common practice for some pro mac bakers! (Refs 1, and 2 who themselves reference the expertise of Pierre Hermé).

They tend to slightly overbake their macs (to ensure their macs remain full) but then apply moisture back into the bottom of the cookie by way of simple syrup, milk or sweetened condensed milk! So, I have chosen to use simple syrup (1 part water to 1 part sugar, boiled until the sugar has just dissolved, with a dash of vanilla extract). I quickly dunk and then lay them bottom-side up on a cooling rack and watch the cookie absorb the syrup before piping the filling (using Loyal plastic tube size 11 (11mm round tip)). Maturation took two days (using white chocolate ganache filling). It was perfect – crunch on outside, soft filling that just melts away – divine <3

Can you go to the shops for me please?

So a very good friend of mine has asked me to create her birthday cake for this weekend, and she has kindly offered to help me pay for ingredients/supplies. Without giving away the design, the cake will be a white chocolate mudcake, filled with coconut flavoured buttercream and homemade pineapple curd. Covered with white chocolate ganache and fondant. The cake will feed approx 38.

I thought this might be a fun challenge for you to participate from home (if there’s anyone out there reading this blog lol). Can you (hypothetically) do the shopping for me please? I have broken the lists down into 2 for you – one list is for stuff you’d find at the local supermarket.  The other list is for the stuff you’d find at a cake specialty store. Can you work out how much everything is going to cost? You might like to undertake this exercise if you’re intending to make a cake from scratch yourself and thinking how much it’d cost just for ingredients/supplies.

Stop 1 – The supermarket

  • 2428g white chocolate
  • 1209g butter
  • 898ml milk
  • 693g caster sugar
  • 35ml vanilla extract
  • 11 large eggs
  • 3 egg whites
  • 359g self-raising flour
  • 539g plain flour
  • 449g icing sugar
  • 20ml coconut extract
  • 120ml canned pineapple juice
  • 2 tbspn cornstarch
  • Baking paper

Now I bet you’re wondering: surely you get these supplies from your wholesaler? Well – no, I don’t. Because while I do have an ABN and do have a wholesale account, I find that because I work my day job everyday, I am not at home and so unable to receive deliveries from my wholesaler. Bummer yeah? Mind you, I do buy in bulk when things are on sale (where possible) and I know where these ingredients are the cheapest so buy things when I just happen to be at a particular store.

Why don’t you open up a new tab and figure out the cost for me for those ingredients – at your supermarket/s of choice. If you find some things cheaper at one over the other – you could take the extra time/fuel to travel between those two or three and get the cheapest options available. But please don’t charge me for that – surely I shouldn’t have to pay you for time/fuel as I am not passing those kinds of costs onto my customers. After all, I’m sure you’re already going to the shops anyway, this is just a few extra things 😉

Stop 2 – The Specialty Cake Shop

  • 1500g fondant
  • 250g gumpaste
  • 20 floral wires
  • Safety Seal (let’s say 50c for this one as I don’t need to use much)
  • 8 bubble tea straws
  • 1 centre dowel
  • 20g gold lustre dust
  • Rose spirite (alcohol)
  • 9″ cardboard round
  • 12″ marble masonite cakeboard
  • 12x12x12 cake box

I’m located in Canberra – so your major options are going to be either Cake Decorating Solutions (Fyshwick), La Torta (Majura Park) and/or Across The Board Cake Decorating Supplies (Greenway). You’re welcome to buy things online – but bear in mind, this stuff would need to be ordered at least a week or two in advance to allow enough time for delivery. Also, postage and handling fees.. surely they can deliver for free so I don’t have to pay for that, right? 😉 haha Oh and again – for the local options, if you could not charge me for the time/fuel for that, that would be grrrreeeeaaat (if you haven’t seen Office Space, I highly recommend you do lol). Again – these are the kinds of costs I don’t pass onto my customers, so I cannot afford to pay you for that.

So – have you got your price?

I came to $92.47. How does yours compare?