So you have a special occasion coming up and want to get a special cake for it (nothing says “celebration” like a cake, amiright?!). You search through Instagram and Pinterest, have collected a bunch of inspo-pics, and start doing the rounds, spamming a bunch of cake-makers for quotes for a custom cake, wanting to find the best price (because naturally, we all want the cheapest and ‘best price’). If you’re new to this scene, you’re probably going to need to sit down as you start sifting through the quotes you’ve received – you may even be thinking, “I’m not paying that much just for a cake!” But at the core of it – you’re not. You are paying for not only a cook to bake you a cake in whatever flavour/dietary requirements you want, but also an artist that will bring the cake to life and decorate it to your specification. If you wanted “just a cake”, you could go down to your local supermarket for that. You are looking for something special. Well, hopefully this post** will help you attain a special cake you’re looking for, in a budget that you can afford 🙂
Before you begin finding a cake maker, Set Your Budget…
As with any purchase, it’s important think about what your budget is before you begin getting your heart set on something completely out of reach. A good starting point might be to check out a bricks-and-mortar bakery and see what they have on offer in their standard catalogue. One example might be the Cheesecake Shop. You’ll find their party cakes range from $49.95-$69.95 (12-24 serves). Bear in mind that these designs are not custom, and they are made in a mass-produced environment, so expect the pricing to be higher of a bespoke cake-maker and set your budget accordingly. An analogy to this would be ready-made suits from a department store being cheaper than a tailor-made suit. Even if all the ingredients & supplies were the same, they would not cost the same.
Choosing the cake maker…
You head to Google; you head to Facebook.. it’s overwhelming how many cake makers there are, isn’t it? Where to start … I often see posts on Facebook community groups asking for recommendations because there’s so many to choose from! Well here’s a couple filters for you in the hopes of narrowing your search to finding the cheaper option.
Bricks & Mortar Bakery vs Home-based Cake-maker
I think some fall in the trap of expecting a home-based cake-maker to be the cheaper option of the two, but oftentimes I don’t think that’s the case. Remember, even though the bricks & mortar bakery may have higher overheads (rent, paying staff, etc), they produce en masse and they buy in bulk. Typically, they would be baking from professional-grade cake mixes and using ready-made fillings etc.
One exception to this expectation that a bricks & mortar bakery is more likely cheaper, is the “backyard” or “hobby” baker. This is someone that is not officially registered with their council to produce & sell food to the public, and also wouldn’t be insured – so therefore do not have those overheads to consider, and also likely not paying taxes on the cake sales either (ie black market). While a backyard baker would be cheaper, my recommendation is to still find a registered & insured food business.
Full-time vs Part-time/Casual baker
If you have decided you’d like to support a small home-based cake maker, then the next way to likely save, is to choose one that makes cakes full-time as opposed to part-time. Full-time cake-makers are more likely to buy their ingredients & supplies in bulk, as well as produce in bulk, so would be more likely to pass on some savings than cake-makers who do smaller amount of orders.
The noob baker vs the experienced baker
While I’m sure you’ll be wanting the best of the best for your cake, finding someone with less-experience/newer business could also be a way to find some savings as well. I think this is especially true if you have a design that they are personally interested in but have not done it before. What tends to happen (from my own experience as a cake-maker), is:
- I don’t really know how long it’s going to take, so I underestimate labour
- I don’t feel confident in how the end product is going to be, so tend to quote on the lower side
- If it’s a cake design/technique I’m personally interested in but haven’t done it before, I’ll subconsciously offer it cheaper just so I can get the gig – that way I can then add the pics to my portfolio (rather than me doing a mock cake from my own pocket just for the pics)
The Cake…
So now we’ve narrowed down the shortlist of cake-makers to request quotes from, let’s talk about your cake and the ways in which you can save money on the cake itself, no matter which cake maker you go with.
- Buttercake/sponge cake vs mudcake – buttercake/sponge cake tends to be the cheaper option.
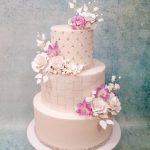
- Buttercream vs fondant coverage – buttercream is the cheaper option. Of course, there are going to be some cakes that fondant is the only way forward, but if there’s any way you can opt-out of fondant coverage, take it to save some $$$ (added bonus, most people tend to find buttercream tastes nicer anyway). If you find a cake-maker experienced enough with buttercream, they should be able to do a good enough job that you wouldn’t even know if it was buttercream or fondant.

Buttercream or fondant?
- Buttercream vs fondant decorations – as above, typically, buttercream is going to be the cheaper option as it is quicker, and therefore less labour. If you can find a buttercream-skilled cake-maker, you’ll could find yourself saving some $$$.
-

-
Buttercream ruffles
-

-
Fondant ruffles
-

-
Buttercream roses
-

-
Sugar roses
-

-
Buttercream succulents
-

-
Sugar succulents
- Fondant vs plastic figurines – if you’re looking for a novelty cake, using plastic figurines instead of fondant is another quick way to lower the price and can look just as effective. Added bonus – the figurines can be kept once the celebration is all over.

- Edible images vs hand-painting/additional fondant work – edible images in and of themselves are not cheap, but compared with the time (labour) involved with hand-painting, it would be the cheaper option. Again, when used correctly, these can look very effective.
- Fresh vs sugar flowers – if you’re looking for a lot of flowers/foliage on your cake, then I would say go with fresh florals to save money. However, if you were looking for only a smaller amount, or particular rarer or non-food-safe flowers, you may find sugar flowers are the better (or only) option. Sugar flowers do take a bit of time to make so don’t expect them to come cheaply, but some costs can be saved if the cake-maker can source some suitable, ready-made ones from a cake decorating supplies shop.
- Naked vs decorated cake-board – If your cake inspo picture has a fondant-covered and fully decorated cake-board, you may want to ask the cake-maker if you could change it to have just plain white/black board instead, or if they could use a designer cake-board. This also could help in reducing costs and you can find some really good designs these days for cake-boards.
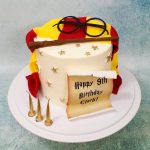
- Gold leaf vs metallic gold paint – while any custom cake is really a luxury item, sometimes you want it feeling really deluxe. Queue the gold! I’ve seen cakes covered completely in gold leaf, and while they look luxury, they certainly would cost luxury too! Another way to keep the luxury feel but on a fraction of the cost is to apply only a scattering of gold leaf instead of complete coverage. If you reallllly want the whole tier gold, though, you could request it just be painted in gold instead.
- Cake vs cupcakes – a tad controversial as it means giving up the idea of having a cake per se, but I’ll include it anyway. Even though cake makers tend to have a minimum purchase amount of 12 or 24 cupcakes, you might find it cheaper to get themed cupcakes instead of one cake. Added bonus, there should be no cake-age if at a venue, and you don’t need to stress about cake-cutting/serving.
The bottom line…
At the end of the day, the purchasing of a custom cake is always going to be a luxury item. Unfortunately we all find ourselves, at some point or another, unable to afford the things we so wish we could. If you were looking to have a go at making the cake yourself, you can find some recipes on my website but there are heaps of good ones available for free online. Don’t fancy yourself a baker? No worries, you can buy naked cakes ready to decorate from cake supply shops (even online to be delivered directly to you!), and you can even get ready-made frosting and other decorations from cake supply shops and supermarkets. You could even buy an all-in-one DIY cake kit online to save some time! As another alternative, you could try your hand at doing the famous Woolies/Coles mudcake hack – there’s even a Facebook group dedicated to it if you need some additional support.
Remember, that even if it doesn’t turn out to be your dream cake, that you at least got to unleash your inner cake artist and was brave enough to have a go. Sometimes we find ourselves so full of self-doubt, and fear the thought of failure so much, that we don’t even try. And honestly, I think sometimes that can be the biggest cost.
** Disclaimer: The information posted on this page is intended as a general guide only, and is based on my own experience as a home-based, part-time registered & insured cake-maker. There are always going to be exceptions (eg specials/sales, customer loyalty discount offerings, free/cheaper delivery option, etc), so be sure to do your own research on the businesses in your area.